Minecraft
Custom Logs
[!WARNING] This entire system is temparary, and due a rework.
Creating custom logs will require you to have knowledge of Java, as well as Gradle, Spigot development and Git(hub). Since Java is a compiled language, you'll need to code and recompile the plugin yourself. This guide will run you through the steps.
Cloning
To start, clone the Minecraft Integration Repo into your prefered working area.
git clone [email protected]:SquishLogs/minecraft-integration.git
Open the project in your prefered IDE next (I reccomend IntelliJ) and now we can get to the coding.
Creating a Listener
Your custom listeners will be placed inside the wtf.squish.minecraft.loggers package, along with the rest of them. Simply create a new class, naming it the category you want to log e.g. to log things relating to Factions, the class would be called FactionsLogger.java (it doesn't actually matter, it's just for if you want to follow our format too).
From there, we can mark the class as a Listener and put in an event for it to listen to.
package wtf.squish.minecraft.loggers;

import org.bukkit.event.EventHandler;
import org.bukkit.event.Listener;
import org.bukkit.event.block.BlockIgniteEvent;

/**
 * Logs actions that relate to fire and burning, so we can monitor when that one asshole burns down a forest.
 * @author Livaco
 */
public class FireLogger implements Listener {
    /**
     * Logs when a player ignite a block.
     * @param event The event.
     */
    @EventHandler
    public void onBlockIgnite(BlockIgniteEvent event) {
        // placebo
    }
}
From here, we need to register the listener for SquishLogs to use. Going into the wtf.squish.minecraft.SquishLogs class and scrolling down to line 52, you can see where we register our listeners.
/* (stuff above) */

// Register our listeners
// Register your custom loggers here!
getServer().getPluginManager().registerEvents(new PlayerLogger(), this);
getServer().getPluginManager().registerEvents(new SystemLogger(), this);
getServer().getPluginManager().registerEvents(new CombatLogger(), this);
getServer().getPluginManager().registerEvents(new WorldLogger(), this);
// Don't touch anything beyond here :)

/* (stuff below) */
You can just register your listener in there, like you would any other plugin.
getServer().getPluginManager().registerEvents(new FireLogger(), this);
Creating Logs
Now we can get onto the main event, the logs themselves. Creating the actual logs is very simple. Each log is made up of "fragments" which are seperate bits of data that gets combined together for the full log. Here's an example for renaming a mob:
new Log("World | Mob Renamed")
	.addFragment(event.getPlayer())
	.addFragment(" renamed ")
	.addFragment(name, true)
	.addFragment(" to ")
	.addFragment(item.getItemMeta().getDisplayName(), true)
	.send();
- The Log object constructor takes one argument, being the log category. Name this whatever you think makes sense.
- The object returns itself, so you can chain together functions to make the full log.
- The
.addFragmentmethod adds a fragment to the log. These fragments need to be placed in the order you want them to combine to make the log in, and there's different types of fragments.- Player fragments can be done using
.addFragment(Player player). These fragments represent a player and will allow the person viewing the logs to click and view data about that player. - String and Integer fragments are treated the same, done using
.addFragment(String, string)and.addFragment(int number). The number fragment will be converted to a string internally. This fragment type also allows you to specify a color. There are two seperate ways you can take this. You can either call.addFragment(String string, boolean highlight)to use the default highlight color of rgb(29, 97, 129), or you canuse.addFragment(String string, Color color)to pass in a custom color to highlight with. - Finally, there's Location fragments to display a Location object, called by doing
.addFragment(Location location). These fragments are the exact same as strings/numbers, being converted to string fragments internally and can be highlighted with colors, but the location fragment will automatically format itself to be a coordinate e.g.-2341, 69, 832
- Player fragments can be done using
-
.send()will finalize and send the log to the server. So, let's place in our block ignite log.
package wtf.squish.minecraft.loggers;

import org.bukkit.event.EventHandler;
import org.bukkit.event.Listener;
import org.bukkit.event.block.BlockIgniteEvent;
import wtf.squish.minecraft.entities.Log;

/**
 * Logs actions that relate to fire and burning, so we can monitor when that one asshole burns down a forest.
 * @author Livaco
 */
public class FireLogger implements Listener {
    /**
     * Logs when a player ignite a block.
     * @param event The event.
     */
    @EventHandler
    public void onBlockIgnite(BlockIgniteEvent event) {
	    // Create a new log that's in the category "Fire | Block Ignite"
        new Log("Fire | Block Ignite")
		        // Add a player fragment with the player setting fire to the block.
                .addFragment(event.getPlayer())
                // Add a bit of text with a string fragment - This text won't be highlighted
                .addFragment(" set a ")
                // Add a string fragment with a highlight, for the block name
                .addFragment(event.getIgnitingBlock().getType().name(), true)
                // A bit more text
                .addFragment(" on fire at ")
                // Add a location fragment with a highlight
                .addFragment(event.getIgnitingBlock().getLocation(), true)
                // Finalize and send the log to the server.
                .send();
    }
}
Recompiling
Great! We're done coding, now we just need to recompile the jar for use on a server.
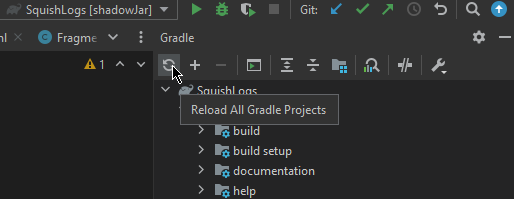
This step is where you need to use Gradle. First, we're going to reload the project so it has all the up to date info and dependencies. This is where it is on IntelliJ, inside the Gradle menu on the right.
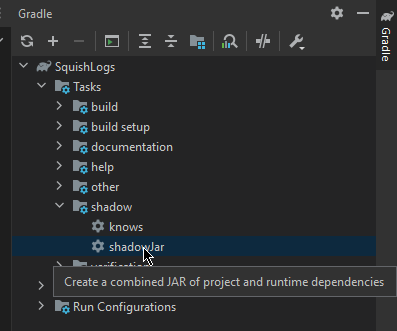
 Next, we just need to run the "shadowJar" file, which will compile the jar file with all our dependencies.
We compile to a shadowed jar so the user doesn't have to worry about our dependency's needing installed either, they can just drag and drop our jar which will contain everything.
 And, finally we can see the build was successful or not at the bottom, and grab our jar from ./build/libs
We can now just drag + drop that jar file into our servers plugins folder. Make sure you keep you original config.yml (if you deleted it, don't worry. Just redownload the vanilla integration and steal that one), and start it up.
And, finally we can see the build was successful or not at the bottom, and grab our jar from ./build/libs
We can now just drag + drop that jar file into our servers plugins folder. Make sure you keep you original config.yml (if you deleted it, don't worry. Just redownload the vanilla integration and steal that one), and start it up.
You should see no errors in your console, with SquishLogs connecting just fine.
 And, when you join and set fire to something, you should be able to see the log appears just fine.

If you need any more help whatsoever, don't be afraid to give us a shout on our Discord Server, and we'll help you get up and running!